Last weekend I had the privilege of heading up to LA to celebrate my sister’s great accomplishment–graduating from college! She even graduated on time, more than I can say for myself!
Something that’s really common in Southern California is that graduates often receive Hawaiian leis to wear with their robes. Usually they are real flowers, although I have seen artificial ones, candy leis, and money leis! Instead of buying a lei I decided to make one myself combining candy and money.
While I was working on this project, Doug asked if this was a common tradition. I realized that in all the graduations I’ve attended in Kansas– I never saw a grad receive a lei! Usually if they get flowers, it’s in a bouquet. I guess this gift has become more widespread in California because there are a lot of Hawaiians and other Pacific Islanders living here. I’ve seen leis given to grads by family and friends at every graduation I’ve been to here in CA, and I love this tradition!
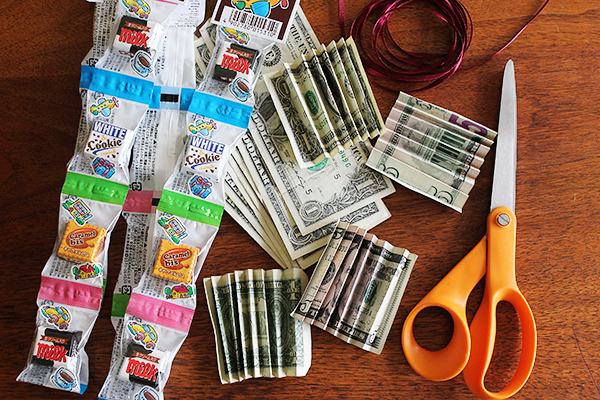
To make this product, I used two long chains of candy, tape, money, and ribbon. If you don’t have access to cute Japanese candy like I had, you can make a candy chain with any kind of candy by following this video. San Diego locals: I got the candy chains at Marukai Market on Convoy St.
To make your own–here are the steps!
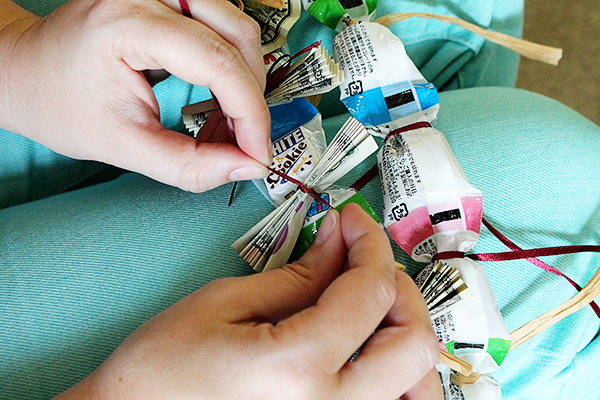
- I taped the chains of candy together using packing tape to make them into a necklace.
- Cut the ribbon into lengths you feel comfortable tying into small, tight bows. My pieces of ribbon were about ten inches long.
- I decided what color pattern I would tie my bows in–this is an extra step since I ran out of burgundy ribbon… I had to sub in some raffia in a couple of places. I ended up going with two burgundies, then one raffia (repeated x 4). Making a pattern looks really nice though, and you could use school colors!
- I double-knotted the ribbon between candy pieces first, before adding the money, just to make sure it was tight. I did all of this at once, then it was time to add the money!
- To make the dollar fans: First, you want to fold all of your bills into a tight accordion.

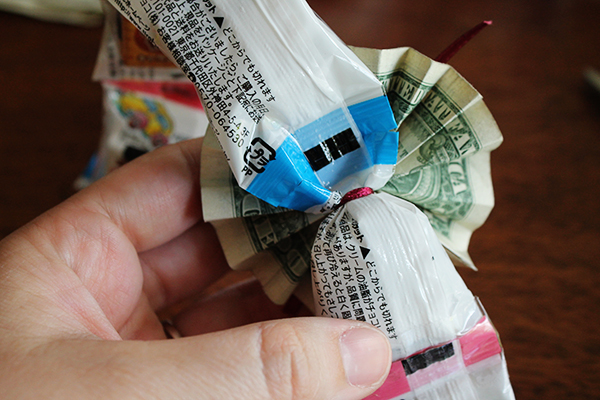
- Then, attach this to the lei by tying a bow around the center of the accordion. Make sure the accordion is “standing up” from the candy at a 90-degree angle, and that your bows are very tight and secure!
- Finally, create a fan by opening up the accordion and taping the edges of the money together. The nicer your money is, the nicer the fan will be. Try to get crisp bills!

This project took me a little over an hour, after I had gathered all of my materials. This is my own twist on the regular money lei. If you want to see a “normal” version accompanied by a how-to, check out this video. I used the video as a resource as far as figuring out how to create my dollar fans–I think he uses over $50! Full disclosure: I used $20. Ten 1-dollar bills and two 5-dollar bills, which meant I created 12 fans. You can make a lei with any amount you want!
I know, I know… you’re dying to see the graduate with the finished product!

Congratulations, Stephanie! Your family is so proud of you!

Nice idea! Proud of your sister!
This looks so great, Staci! And Congrats, Stephanie!!
Love you girls,
Ashley
I got so many compliments on my lei but most of all, I loved the thoughtfulness and time that went into making it. It was so much more special than flowers! Thank you so much!
where can I buy $50 dollar money lei. am here in tempe, arizona. please email me malu816@cox.net. Thanks
Check out money leis on etsy. https://www.etsy.com/search?q=money%20lei&view_type=gallery&ship_to=US
I’m making one too, heading to Murakai today! Sounds like a cool place.
Have fun!!
WOW, thanks for the lei idea AND for turning me on to Murakai, what a great place!
Greaat post