Inexpensive Fabric Wall Decor

On Wednesday, Libby asked to know a little bit more about what was going on behind my couch. I am more than happy to oblige!

The fabric panels behind the couch have been with me a long time. When I moved into my first apartment (with a roommate) in 2007, it was 100% furnished with leftovers from my parents’ guest room. Okay, that’s not entirely true. The coffee table was a deeply discounted floor model from the local IKEA. Can you believe I dug up an old photo of my first place?

Old, old, old living room

Isn’t it amazing how far digital camera technology has come in the past 6 years?
This looks like it was taken with a cell phone, but I assure you it was not. 

While at IKEA nabbing a cool coffee table for a cheap price, some yardage of fabric caught our eye in the textiles section. It was so long ago I can’t remember if we grabbed the remainder of the bolt or just a couple of yards. Anyway, this fabric was being discontinued and my mom and I thought the pastel color palette would really go with the blue-and-white striped couch and easy chair. Note: looks like my addiction to sales, discontinued items, and the “as is” section at IKEA is not a new thing! 

Back in the late 80s and/or early 90s, my mom actually stretched canvases as a side job. Or something like that (I was a baby so my memory is, understandably, not crystal clear).

She was happy to revive her skills and help me out by doing these!

Wall Hangings

I like how they can be flipped and rotated to create different designs (compare this arrangement to the first photo in the post).

These beautiful pieces really haven’t had a home until now. They were just what the room needed to balance out the height created by the sliding door and barfy vertical blinds. They help the “living” area look finished.  I was worried that Doug would think they were too feminine, so I didn’t press the issue–but when he saw them he actually really liked them!

This is an awesome, and like I said, inexpensive way to make some large-scale art for your living space. Large-scale art is often expensive but it can really make a good impact–I think I have achieved that here! You could even use a tablecloth or textile found at a thrift store, or pick of fabric at the local JoAnn’s. I can picture an awesome ikat fabric, or suzani, or otomi… it seems like geometric or “native” types of print work really, really well with this kind of project.

I like this particular fabric because it has an ikat motif (gray) a sakura motif (green) and a moroccan/arabic star technique (blue)! Of course, I didn’t know what the terms for these designs really were when I bought the fabric… you don’t have to like something just because it’s trendy–just pick something you are drawn to! It’s what I do and it seems to work out well.

Wall Hangings

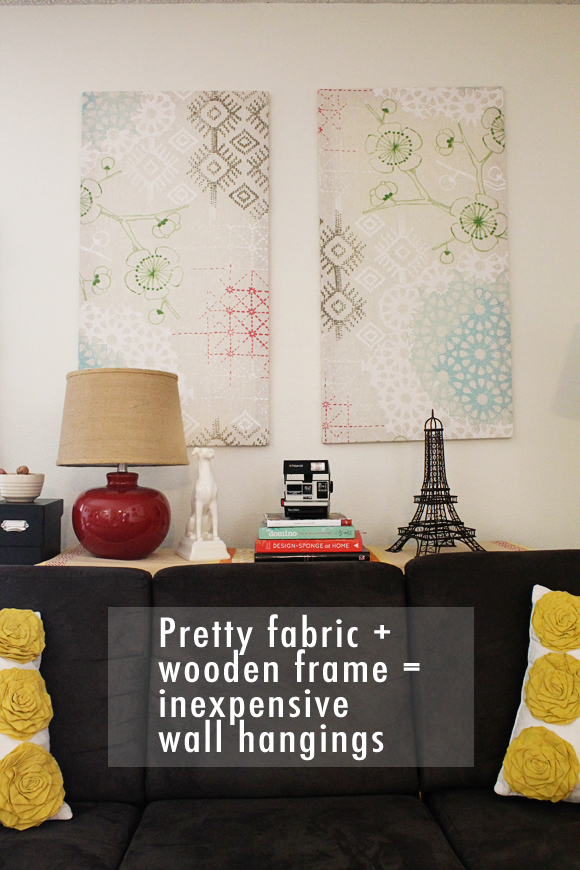
Want to create your own wall hangings? Grab some stretcher bars or any old wooden frame and stretch your favorite fabric!

I don’t have a step-by-step DIY tutorial for you, but maybe watching this guy will help.

Advertisement

EXPEDIT-ing the Unpacking Process

Yesterday marked ONE MONTH since we moved in here! I’m happy to report that everything has been unpacked and stored away save for 4 pesky boxes still taking up residence underneath our new china cabinet.

One HUGE obstacle in our unpacking process came in the form of 6-10 boxes full of books. We had nowhere to put our books since in the first place we had built-ins, and before moving we sold the bookshelf from Target.

Sidebar: Truthfully, they weren’t FULL of books–here’s a moving protip for you: When packing something heavy like books, fill the box 50% full of books and 50% full of something light like linens. By splitting the difference, the boxes are lighter and more manageable and you might even prevent yourself from injury.

Once I realized that our bar stools were totally NOT going to work under the breakfast bar I began envisioning an area of shelving spanning the whole length of the counter. Someday I will do a custom shelving installation–really, I will– but for the sake of our rental deposit I measured the area and started thinking prefab. EXPEDIT immediately came to mind because I just love the geometric pattern of the squares. The nice thing about these (as opposed to other assemble-it-yourself shelving) is that they are very deep and can accommodate two layers of books.

My original plan was to get two 8-hole EXPEDITS (two squares tall by four squares wide) but my space was four inches too short. So glad I took the time to measure the space before we headed to the store. So we decided to get some of the smaller ones, two squares both wide and tall. After some brainstorming involving pseudo-installing our huge speakers and hooking them up to a (yet-to-be-purchased) turntable, I bargained with Doug that once we save up our pennies for the dreamed-of turntable, then the speakers would come out of hiding and get put to use. So they got sneaked behind the couch into another project I’ll share later this week–and EXPEDIT was able to take up the whole space.

We’d decided to save up for the units but when we saw two white ones in the as-is section for $25 each we nabbed them up. Isn’t that always how it goes.

Then, my mom came down for the weekend and generously insisted on buying us the third one (really, we did protest), so now the space is taken up much more nicely:

I love the geometric look and how the crisp white anchors the chaos of books and nick-knacks. Organized chaos seems to be the name of the game with this apartment so far. I’m really happy to have these now because these units can be used in countless ways–console table, desk base, or even at the foot of the bed someday?

Right now there are gaps between the three units and sometime I may see what it looks like all shoved close together. For now, though, the gaps provide a safe place to tuck framed pictures so they’re out of the way until we decide where to hang what. Maybe I’ll organize the books by color or by subject? I don’t know. They are all just thrown in there, sort of grouped by size. The GREAT news is that the boxes holding them happily made their way to the recycle bin!

IKEA Kansas City

Okay, I had other things on my mind for today but seeing how (by my estimations) about half of my readership lives in the Midwest, this is BIG NEWS. I hereby interrupt your regularly scheduled programming.

IKEA IS COMING TO KANSAS CITY!  (Fall 2014)

Read the full article on the Kansas City Star website.

This is huge for low-budget interior decor enthusiasts like myself. You may remember that a year ago, my cousin got hitched in Dallas and we snuck in an IKEA trip while we were there, which resulted in the long, looong boxes being slid into the car in a very tricky way–we had to fold down the passenger seat and the right rear seat and put the boxes in all the way up to the glove box. Then I had to ride in the back rear seat, single file behind Doug all the way back to Kansas (7+ hours).

Now, for those of you in central Kansas that trip is down to THREE HOURS or less! Think of the eight hours saved round trip and smile to yourselves. I am definitely smiling for you.

Have a wonderful weekend!!