Bugs, be Gone!

I will say one thing about our apartment complex–the maintenance guys are very attentive and quick to respond, when we place a service order through our company’s website.

For a week or so I had been seeing some straggler ants on the linoleum by the front door. I would just kill them, scan the area for their buddies, then go on my way. I even saw a stray in the bathroom a few times, but didn’t think too much of it… a nuisance, but probably just looking for moisture, as bugs tend to do.

One day, though, I killed 10 in the kitchen before work and decided to put in a service request. Living for over ten years in Temecula, which is notoriously bad with ants, has instilled a paranoia in me that once I see even one in the kitchen, nothing is safe anymore. I put in the service request and we had an appointment set for the next week.

Kitchen Unloaded

Unfortunately for us, prepping the kitchen and bathroom for the exterminator’s attention meant (dun dun dunnn) emptying every cabinet and drawer and wiping them out.

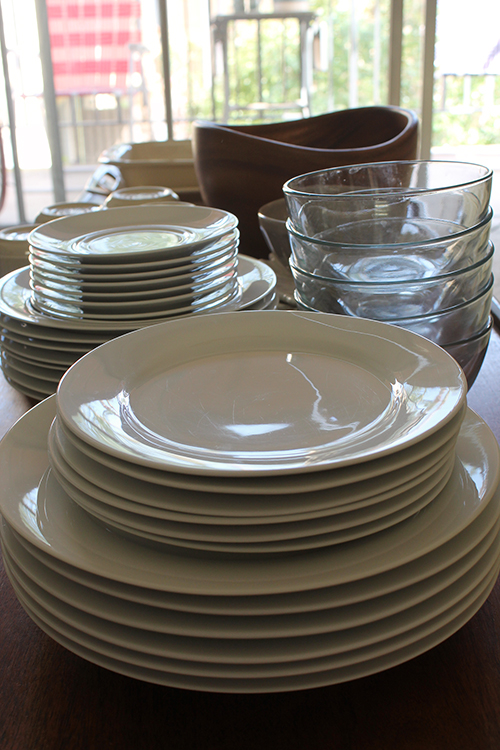
When’s the last time you emptied your whole kitchen and wiped out every cabinet? My money’s on “not recently.” You will be surprised how grungy drawers can get (yuck!) and surprised at how much stuff fits into even a small apartment kitchen:

Kitchen Unloaded

(The majority of our pile was not as picturesque as our coffee table full of dishes from above.)

Glad to get that taken care of. Doug hemmed and hawed about it, thinking what a pain it would be to empty out the whole kitchen… then again he’s never lived through a full-blown Southern California ant invasion, so really he doesn’t know what we’ve avoided. I was at work when the exterminator came, but Doug said that he was professional and quick. Yay!

My major take-aways from this experience were:

  • So glad we’re not moving after all (read: look at all that stuff!)
  • I’m glad we can call and have something like this arranged for us, unlike with a previous landlord who was very, ahem, laissez-faire with repairs, etc.
  • Well, now the inside of our cabinets are clean and kinda reorganized!
  • I still really, really like my whiteware dishes (from Crate and Barrel).

Chalk one up in the renters’ column… you don’t have to pay for things like this! Additionally, we finally got the large burner on our stove fixed (we had been cooking with three small burners) and it’s amazing how much faster a kettle boils on an appropriate sized coil! Imagine that!

Any boring but important repairs around your place lately? 

Stephanie’s Bachelorette Night!

Bachelorette Invite

Bachelorette party invites by Flapperdoodle on Etsy. 

One of the most enjoyable parts of being Maid of Honor was preparing Stephanie’s bachelorette party. I don’t have space to hold an event in my little apartment, and instead of a crazy weekend out of town, or reserving a table or room at a noisy, crowded restaurant, I called on a contact I had met at Sur La Table who hosts private, four-or-five course meals in their “underground supper club.”

So, our little group of ten got all fancied up and met at an undisclosed location, and the night began! Unfortunately, the low light made it really hard to snap photos. I did manage to get one grainy cell phone shot with the lady of honor!

Steph and I

We had an amazing Indian themed meal made from local ingredients.

  • Curried deviled eggs
  • Kale salad with feta and apples
  • Chicken tikka masala with rice
  • Peach strawberry crumble

Stephanie wasn’t feeling well that night, so all in all, a low-key (but so fancy!!) dinner party was just what the Dr. ordered, as opposed to a crazy night out on the town. Truly, the gourmet meal, funky and eclectic setting, wonderful service, and good friends made it a night to remember.

Goodie Bag

Hoping everyone was inspired by our chef, I sent the girls home with a “supper themed” gift bag containing a fabulous glittery paring knife, sweet treat (courtesy of our hosts), and a few recipe cards.

It’s so hard to believe this was already three weeks ago! Where does the time go? 

DIY Wedding Bouquets (Faux Flowers)

To save money on her wedding, Steph agreed to let me try my hand at arranging flowers for her bouquet and the bridesmaids’ bouquets. I had so much with these faux flowers!

My first foray into faux flower arranging was a year ago when I helped create my friend Lisa’s bouquet for her own big day…

Lisa's Flowers

Lisa's Flowers

Photos by Scout Weddings.

So since I had a little experience, I kind of had a starting point for Stephanie’s wedding. First, we identified the color scheme of the wedding– Magenta and “metallic tones.” Since the venue was more of a tropical setting, with a pond, palm trees, and other lush greenery, we decided to go with bright and vibrant greens, as opposed to the dusky earthy tones I had used with Lisa’s bouquet. I created the bride’s bouquet first, and then did the MOH’s as a kind of “prototype.” We realized that the “star” flower was out of our price range to include in every bouquet (we were trying to save money after all) and created a scaled-back version of the MOH’s bouquet for the rest of the girls.

For the Bride, we found the most amazing pink flower, perfect for the color scheme, then accented it with browns and whites:

The Bride's Bouquet

The MOH (me) got a gorgeous white version of Stephanie’s pink flower, with matching white hydrangeas and a brown version of the anenome flower:

The MOH's Bouquet

And the bridesmaids (six!) got arrangements of white and brown. They are the same as the MOH arrangement minus the more costly white bloom–they have the same brown anenome, brown roses, and white hydrangeas:

The Bridesmaids' Bouquet

Since these photos are close-ups, it’s a bit more obvious that the arrangements aren’t real flowers. On the day of, however, I doubt people could tell, or were even thinking about them.

Here are a few tips if you decide to try your hand at a DIY faux flower bouquet. Got more tips? Share in the comments.

  1. Splurge and get the nicer flowers. It’s easy to tell the difference between a $15 stem and a $5 version of the same flower.
  2. Shop when they’re on sale. Both times, I got flowers from Hobby Lobby and they put their silk flowers on sale every two to three weeks.
  3. Bunch all the flowers together while shopping, and create the loose idea of what you want the arrangement to look like while still in the store. Our cart looked very crazy with all kinds of different flowers until we decided on our winners.
  4. Keep warm tones and cool tones in mind when choosing flowers, and pay careful attention to the leaves–they are the most tonal (brownish, blueish, yellowish green) and more apt to clash.
  5. When arranging, start with the main flower and accent flower(s) and create what looks like a triangle from above. This will help the bouquet look attractive from any angle. Then, begin adding in greenery as filler. Here’s a little illustration:
  6. A Bouquet Triangle
  7. Keep turning the arrangement around and around while working on it. Make sure all the sides look nice, because the person holding it will not remember to hold it a particular direction. I guarantee it.
  8. Get creative when it comes to greenery! It’s the weakest link, in my opinion, when it comes to faux flowers. There are simply not as many plain foliange options! I wouldn’t have normally gone for this faux boxwood but the vibrant, pure green was just the tone we needed. I’m so happy we used it!
  9. Tear it apart! Our boxwood stems came with four to six (I can’t remember) “pieces” attatched together. By separating each boxwood sprig, we could poke it into the bouquet just where more greenery was needed.

Bridal Party


Photo by Faithfully Focused Photography

My favorite thing about faux arrangements is that they last forever! My mother had faux flowers at her wedding in the 80s and she still has her bouquet.

Thanks for reading! I really had so much fun creating these.