Fancy Ramen using Not-So-Fancy Ingredients

Ramen has been growing in popularity in the past couple of years, which is a real head-scratcher to those who only ate it in college due to the ten-packets-for-a-dollar price tag. San Diego has a bunch of fancy ramen places that have grown in popularity (like RakiRaki and Underbelly), and consider me a real convert.

Doug and I made such pretty ramen at home last night that I had to document it, then I thought, considering how easy it was, that I should clue others in to this cheap and easy meal. Even though spring has come (yay!!) I know that cloudy and rainy days (snowy, in some parts in the country) will still show up in the next month or so, so have this recipe in your back pocket and you’ll have something easy and warm to eat.

Ramen at Home

Needed for one bowl:

Ramen packet
Miso paste
One egg
Green onions
Radishes
Soy sauce
Sriracha
Black sesame seasoning (mainly for looks)
(We also added carrots, which was not my favorite addition)

You probably have many of these things in your fridge/cupboard right now. The most expensive things on this list would probably be the soup base and the soy sauce, but broken down into a per-meal price, this whole bowl of soup probably comes to less than a couple dollars.

Instructions: 

Bring two and a quarter cups water to a boil. Once boiling, add the egg. Let the egg boil for three minutes, then add ramen noodles and boil three minutes, according to packet directions. (The egg will be boiling for a total of six minutes).

While the egg/noodles are boiling, chop as many green onions as you like, and slice the radishes thinly.

When the timer goes off, fish the egg out with a spoon, run under cold water, and peel. Be careful because the egg will be soft-boiled and easy to squish. While the egg is cooling off (before peeling, I guess) add the soup paste to the water and noodles, and stir to mix. Sometimes I use a little less than the soup base calls for and sneak in a little bit of the seasoning packet that comes with the ramen ;)

Serve up in a deep bowl. Add the egg (you can cut it in half with your spoon as you eat) and top with radishes, onions, sesame, and soy sauce/sriracha to taste.

Told you it was easy! Do you have any super-cheap go-to meals? Share the recipe with me! 

Chorizo Pesto Tortellini

I posted this pic on instagram and thought it was so pretty and the food was so delicious that I had to share the recipe with you guys, if you can even call it a recipe.

Raise your hand if it’s been hot and muggy where you live this summer. This weekend was especially humid, which for San Diego is a big deal. I didn’t want to turn on any heating elements in the kitchen, but we had this fresh tortellini I was worried about turning the corner. So, tortellini for dinner indeed. The good thing is that the amount of time my stove was on was brief.

Ingredients:

  • Tortellini (I prefer cheese tortellini, fresh, not frozen, tricolor)
  • Pesto sauce
  • Shredded parmesean
  • Cherry tomatoes, quartered (mine were so small I just tossed them in whole)
  • Chorizo (I used linguiça, a household favorite since we made Choripan a couple of years ago) Pancetta would also be a yummy option, but takes longer to cook
  • Lemon
  • Salt
  • Good quality olive oil

Directions:

Bring water to a boil, and meanwhile begin preheating a small skillet. You’ll want the skillet right at medium heat.

Cook tortellini according to package instructions. Since mine wasn’t frozen, it only took 2 minutes once the water was boiling. I removed from water using a slotted spoon and put directly into our bowls.

Meanwhile, cut up chorizo into small cubes. Throw them into the skillet with a little oil until hot, greasy and yummy. The reason I like using a sausage like chorizo it it’s already cooked or cured, which means cooking it is really low pressure. Just get it up to heat and it’s ready. The meat step and the tortellini step took me about the same amount of time and were ready simultaneously.

Spoon chorizo onto cooked tortellini in bowls. Immediately sprinkle with cheese so it melts.

Spoon one or two hearty spoonfuls of pesto onto each bowl. Drizzle with olive oil, squeeze on lemon juice, and sprinke a little salt.

Toss on a handful of cherry tomatoes.

Since everything I added to the tortellini was cold with the exception of the meat, it brought the temperature of the meal down to a level that was just right for a humid summer evening, while still being hearty for a good dinner.

I know the recipe is kind of basic but maybe you haven’t thought of this combination yet.
Enjoy! I know I did.


Knife Info 101

When I began at Sur La Table I had no idea what made a knife nice, especially not what made a knife special enough to spend hundreds of dollars on a single piece. Now I know that there are so many different kinds of steel, and they all perform differently. A great knife is one of the most cost-effective ways to upgrade your cooking experience. Prep work will go faster and your cuts will be nicer, easier, more precise.

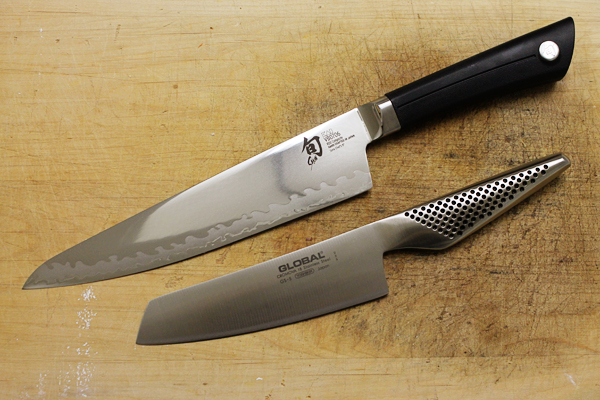
Shun Sora and Global

When I chatted about the new additions to my kitchen, I mentioned that the Japanese steel is sharper and will hold its edge longer. Simply put, Japanese knives can be sharpened to a much more acute angle than German knives, and will stay that way longer, however one must be more careful with them because the sharpness of the steel translates to hardness, and tendency to chip. German steel is softer, more malleable, which dulls more quickly but sharpens up nicely, and doesn’t chip (unless something really drastic happens). Many cooks have one or two of both kinds.

For this reason, someone who has made a real investment in their knives should get the proper honing steel, as well. A German honing steel, for example, isn’t a hard enough metal to clean up the edge on a Japanese knife. A Japanese steel is harder than a Japanese and German knife, however, and can be used for either of them. There are inexpensive ones out there. How do you know if it’s time to use a honing steel? Carefully draw your finger down from the spine of the knife and past the sharp edge of the blade. If you feel a little catch or hook at the edge, it’s time to hone. Never, ever check the sharpness of a knife by feeling the sharp edge with your finger–they can be sharper than you think!

Holding a Knife

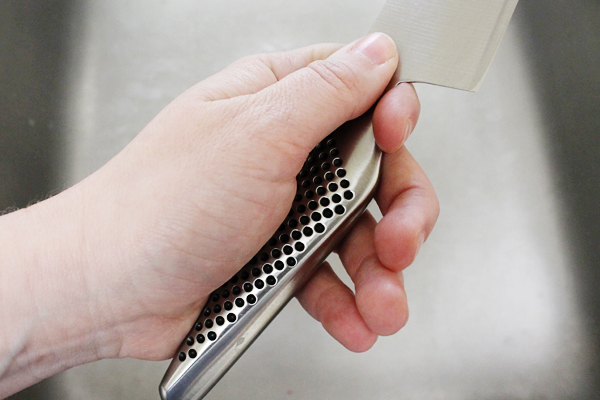
If you don’t know already, here’s an awkward picture of how to hold a knife. Pinch the point where the blade meets the handle. Then wrap the rest of your fingers around the handle to form your grip. This puts the knife in line with your whole arm, and relieves the wrist of unnecessary work. If it feels weird, do your prep work while holding the knife this way for a couple of days, then try the “old” way. My guess is that the old way will now feel more awkward and unwieldy!

As far as choosing your new knife, the best thing to do is find an opportunity to try out several brands, shapes, and styles. My store lets customers test them, and I have seen other kitchen stores that also provide this option. If they don’t have any food for you to chop, at least take the opportunity to wrap your hand around the handle and fake it. The weight and handle should feel good. There’s not really one “best” knife for everyone, that’s why there are so many options out there!

And a quick & dirty review of my choices: I love the two I chose. They are both light yet well balanced.

  • Global is a favorite brand of those in the restaurant industry because they are durable and a cinch to keep clean (since they’re all one piece). Some people don’t like the handle because they’re so unique and seem a bit small, but I really like it, especially for a small knife life my nakiri. This is and will continue to be my go-to prep knife for small jobs.
  • The Shun Sora line just came out. They are not only less expensive than Shun Classic but the bright reflective steel should resist rust/patina more than the damascus pattern of the Classic. It cuts like a dream through everything. We made tacos the other night and cutting lettuce, tomatoes, and even cooked steak (medium and well done) was effortless. I look forward to many happy years together with this knife ;)

What kind of knives do you have? Are you in love with them or are you interested in upgrading?

The Small Print: I wasn’t paid or perked to write my knife posts, in fact I bought these knives with my own cold hard cash after lots of hemming and hawing about what to get. I did use an employee discount. Lots of bloggers get free stuff in order to write reviews; I am not one of them.