Knife Upgrades

It has come to my attention that since I’ve worked at Sur La Table for going on a year and a half, that people assume my kitchen is full of top-of-the-line products. Not so! Surprisingly most of my paycheck actually does come home with me (as opposed to being spent at work). We are still using more or less everything we registered for when we got married in 2010. Most of the stuff we were generously given was good quality, and replacing it would be an exercise in needless expense. I’m so grateful for this fact!

That said, the knife set (Farberware, not carried anymore; see similar) that we were given is good, not great. I knew nothing about knives when we registered at Target so I signed up for one that included LOTS of knives. Just in case, right? I it’s a 20-piece set (includes 8 steak knives), which is HUGE for a knife set! After 3 years, some were getting a little dull, so last spring I took them to work and got them re-sharpened. They were good to go for a while longer, while I decided what I really wanted to get. Some of them are developing brown patina spots, and that’s our own fault for putting them in the dishwasher (see the end of this post for knife care tips).

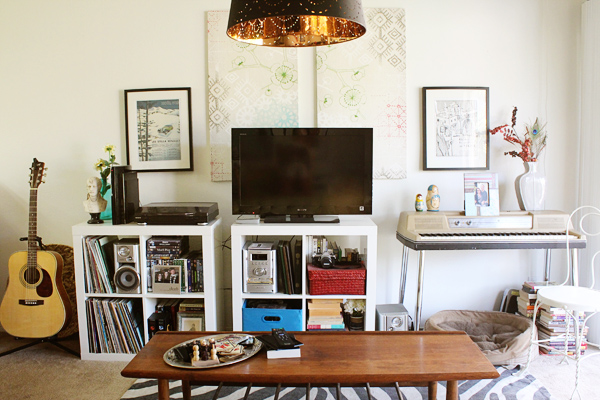
After much agonizing, I finally decided to make a few upgrades to the knife corral. Here’s my lineup before upgrading… a photo I took so I could visually see what I was working with, and do some brainstorming.

My Knives, Before

Many chefs will tell you that a person needs three good knives in their kitchen. A chef’s knife, a paring knife, and a bread knife (with serrations). I like having a bit of a larger arsenal, but overall I agree with this rule of thumb. Therefore, some of my good not great knives are perfect for less-frequent, specialty jobs.

This meant that I wouldn’t need to replace my:

  • Cleaver (far right). Pretty standard, nice and heavy. Does its job well.
  • Carving set (center). Believe it or not I rarely make poultry or roasts that need to be carved. ;) These are in fine shape.
  • Bread knife (long, serrated). In my opinion, all bread knives are pretty similar. Not a splurge-worthy area.
  • Miscellaneous knives (far left). The yellow one was a gift from J.A. Henckles, from attending a training event for work. It is wicked sharp! The gold one’s brand is Kuhn Rikon. It’s also wicked sharp, and cheap. You may recognize it from my sister’s food-themed bachelorette party favor bag.

The knives on the chopping block (pun intended) were my:

  • Chef’s knife (2nd from right). The most-used kitchen knife, I was ready for something sharper made of higher-quality steel.
  • Santoku (3rd from right). My second-most used kitchen knife, I use a 7″ santoku for most fruits and vegetables.
  • Paring and utility knives (3rd and 4th from left). Using the yellow-handled knife has me spoiled! A longer utility of equal sharpness would be amazing.

Since I finally had a chance to pull out my knives all at the same time and evaluate them, I was able to make a decision on what new knives I would get without getting overwhelmed. Now, the knife block boasts two newbies!

Knife Block

Shun Sora and Global

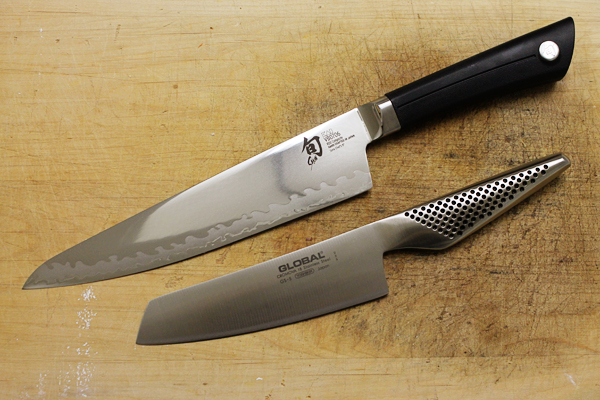
I chose a Shun Sora 8″ chef’s knife and a Global 5.5″ nakiri to replace my chef’s knife, santoku, and utility knife. Two in, three out! I got Japanese knives since they are sharper and more precise than German knives (which the rest of mine are), and they will keep their sharp edge longer. I plan on doing a more in-depth review on these two, and a quick and dirty rundown on Japanese vs. German cutlery later this week. It’s too much info to squeeze into this already-long post, but it will go a long way towards helping anyone make an educated purchase of their own knives. Oh yes, and I promised you some tips to keep your cutlery in top shape:

Tips to make your knives stay sharp and last longer:

  • Use a honing steel to maintain the edge of the blade regularly. This allows you to go longer between sharpenings.
  • Don’t put knives in the dishwasher! Harsh surfacants in dishwasher soaps can damage the micro-sharp edge.
  • Don’t let them sit in water (in the sink, in a puddle on the counter). Brown rust patina spots can develop. Keep your knives dry!
  • Store them in a wooden block, on a magnet, or with edge guards in the drawer. This protects the blade, and your hands!

Do you have a favorite knife brand? See you later this week for more knife talk! 

A Piano in the Home

I believe that the last time I shared photos of the TV wall, the living room looked like this.

After hanging art

I like the art, I like the symmetry, but something seemed to be missing. With the addition of our pine shelves (to the left of the photo), it was getting to shelv-ey around here (what with spanning the whole left wall, and the Expedits dominating the TV wall). Now, this:

Wurlitzer Piano as Decor

I am so happy we hauled the (scavenged, free) vintage Wurlitzer keyboard (officially called a “stage piano”) out of storage. The instant I picked it up at the dump, I knew I wanted it somewhere in my home, but it went to go live in the I Heard A Lion practice space for a couple of years. Once we moved, though, I was unsure of where to put it in our small apartment so to maximize “useful space,” we disassembled it and stored it in the closet.

At first I thought maybe it would seem a little weird to have a vintage keyboard as a decor item at such a prime location in the living room, but its placement has made all the difference in the world! Since I don’t play, knowing what part of the house to put a keyboard in wasn’t immediately evident. Doug does, though (duh, self) and it’s fun for kids that come over to play with it (it makes a little bit of sound even when it’s not on, so it’s fun for them and not annoying for the adults). Pianos in the home are not strange at all, so I don’t know what was with my mental roadblock concerning this piano. Growing up, we always had a piano in the house. My mom’s isn’t large, but it isn’t small either. She plays well, my sister took lessons for a long time, but I was too hopeless to continue my instruction. Now, Doug plays sometimes.

We need to replace some parts inside it because it’s a little out of tune, but it’s still nice. Now I absolutely love having it as one of the focal points of the living area! Really though, I just like gazing at it.

Wurlitzer Piano as Decor

The perfect yellowy beige color typifies that era of musical equipment for me. I’ve seen amps and other gear this color and am always drawn to it!

Wurlitzer Piano

Wurlitzer Piano

I keep going back and forth on what to put underneath it, though. I had filled it with tall stacks of books, but recently we brought my old guitar home from my parents house and needed space for it and its stand. Mosey’s dog bed moved under the piano for now… but the corner is constantly evolving :)

It’s nice to be back to blogging about home stuff. I have a ton of bottled up posts!

Colorful Stripes!

I have felt really antsy lately with the decor choices in the bedroom. When we moved in, we plunked down the black dresser and bedside tables, then hung brown curtains to add some warmth to the white box with black accents. Our DIYed plywood headboard helps add texture, color, and interest. Here’s a pretty old photo. The Christmas lights no longer hang there although I still battle poor lighting in this room, and am stumped about what to hang over the headboard.

DIY Plywood Headboard

Truth is, the bedroom does get the best light in the whole apartment.

I brought out the gray pebble coverlet (Target) from storage and layered it over our blue and white duvet (West Elm). We have been using the duvet empty since our insert is way too warm for our CA weather; even in the winter, however it was much too thin now that it gets into the 50’s at night.

Last Sunday I got a chance to shop at the famous Rose Bowl flea market! We went with hopes of finding some patio chairs (more on that in another post) but overall tried to shop with no expectations. At a flea market, the right items seem to find you. After shopping for a few hours and coming up mostly empty handed, I found a wool Hudson Bay style blanket, with three stripes (red, yellow, and gray). I was excited to see it but disappointed that it didn’t have the punch of green–my favorite color in these blankets. We passed on it but not long after, found a booth that had three Hudson Bay style blankets!!

Since I had three to choose from, I went for the blanket with the most vibrant colors, that was also in good condition (as opposed to choosing by size). It was mine!!

Point Blanket

point blanket label

The label is Witney, a competitor of Hudson Bay. Even though it’s not the “right” brand, I’m very happy with my find.

I removed the blue and white duvet altogether and placed the wool blanket at the end of the bed. I love the perk it brings to the room!

Point Blanket

Point Blanket

My next design dilemma: finding lamp shades for those awesome brass lamps from my mom and dad. Why are shades so expensive!?

Winter, I’m ready for ya!

Psst… if you haven’t, make sure to “like” My Friend Staci on facebook! I’m only 4 away from 100!