Barney Stinson’s Apartment

Over a year ago, I posted about creating a cohesive color scheme for our last house. I lamented the dark gray walls, gray quilt and dark brown wardrobe as looking too masculine, and I name dropped “Barney Stinson’s Apartment” from How I Met Your Mother–in all it’s gray-on-gray-on-gray glory. Surprisingly enough, in the past year I kept seeing “Barney Stinson” apartment-related terms show up under search terms that bring people to my site…. 197 times in total, to be precise.

So, it is official–I must please the masses and come up with an inspiration board based on Barney’s bachelor pad. To be honest, this was a really fun exercise for me, because as I’m sure you know, my friends, this is not my style. Sure, I have a dark gray mid-century modern couch, but I am pretty sure the similarities end there.

I started by looking at screen grabs from the show, which included his living room, bedroom, and kitchen. The color scheme is obvious: grays, metals, and a bit of brown here and there. The set designers on this show really got into the mind of the suit-wearing confirmed bachelor and committed to the motif. There are very few decorative pieces (especially when contrasted with Lily and Marshall’s eclectic abode). Let’s be honest–if his apartment was an outfit, it would be a designer three-piece suit. Here is where I ended up:

Barney Stinson's Apartment

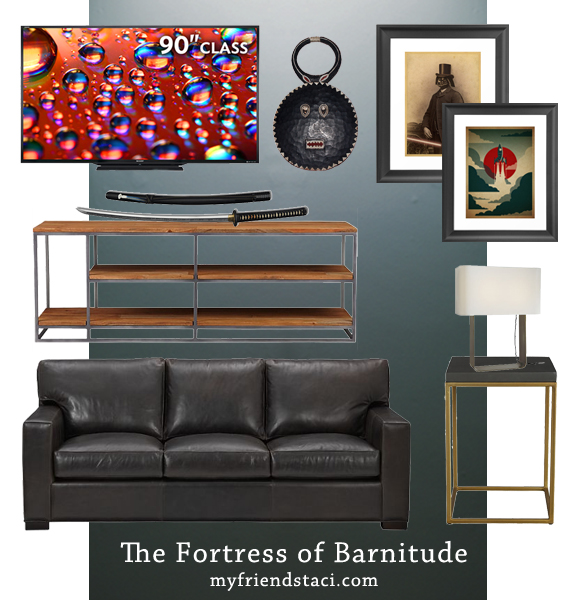
The Paint: Unfortunately, I do not know what color the set designers chose. I do know that Farrow and Ball’s “Down Pipe” is the deep-gray of the moment around the blogosphere, and it seems fitting for this room. Benjamin Moore’s “Dark Pewter” qualifies as runner-up. Design Star Emily Henderson has a list of her favorite gray paints (with a healthy dose of Ryan Gosling) which may also be helpful.

The Couch: While the couch on TV is dark gray (choose “smoke” as color option–pictured), I would have selected a deep brown leather (amaretto) to break up the all-gray party!

The Tables: Barney’s side tables and coffee table feature the same look–metal straight lines with a wood or glass top. Cubes or rectangular box shapes are the key here. Men–you are in luck. This design is everywhere right now. The ones I chose are from CB2–console and side table. IKEA also has some similar options.

The TV: Sure, it’s not a 300-inch screen, taking up an entire wall, but at 90 inches–yes, that’s 7.5 feet–diagonal, this Sharp Aquos LED TV is one of the biggest on the market.

The Extras: Man-cave decor like Samurai swords or tribal masks make the man seem adventurous, while the few art pieces that hang on the wall are reminiscent of quirky movie posters or book covers. The Voyage and Lord Vader Prints from Society6. Duo table lamp from Room & Board.

Extra Credit: If you are in the market for Stinson-approved bedding, you are in luck. If you want your tabletop to reflect the motif, these are the dishes for you.

This was fun–I may make a series of inspiration boards inspired my my favorite TV sets. For more of my inspiration boards, click here

DIY Plywood Headboard

First, I want to thank you all for your kind words about Doug’s stolen bike on Monday. I was also pleased and surprised with the number of comments on the bedroom! It is a great week to be a blogger. :)

File this project under “got it done!” or “procrastination who?”

When Doug’s brother was here in San Diego last week, we hit up the Urban Outfitters downtown to see if they had any winter coats on clearance (they didn’t). While we were there, Matt, who does woodworking, took a particular interest in the fixtures which were made of mainly plywood, 2’x4′ lumber, and pipes! (Related: I found an interesting article on UO’s aesthetic.)

When pondering bed solutions, I realized that using the same materials, I could create a modern, fresh, E-A-S-Y, and cheap headboard.

I got some leftover plywood (the type I used is technically called OSB, or oriented strand board) from my dad’s garage–these pieces were actually left over from when my parents’ house was built in 1999. Vintage!  This kind of wood is normally used as a subfloor or other non-finished construction material.

The goal was to make a headboard 60 inches wide (queen size) and somewhere around 4 feet tall. As luck would have it, the boards my dad gave me were in 20″x48″ panels which means we had no cuts to make whatsoever! We did have to drop about $12 at Lowe’s for the other lumber. I will not say no to a $12 headboard.

Supplies needed:

  • Plywood (OSB) panels
  • One 1″x4″x8″ board, cut into two 4′ pieces
  • One 1″x4″x10″ board, cut into a 60″ piece and a 52″ piece
  • Screws
  • Cordless drill(screwdriver)

The plan was to line the boards up and brace them with lumber from behind–one piece down each side and two braces horizontally. Here’s a shot snapped in Lowe’s after we had our boards cut for us:

headboard frame

Originally I wanted to attach the screws in from behind but after some trial-and-error, and taking into account the way the OSB board would splinter, we decided that having exposed screw heads on the front was not the end of the world. At least I measured evenly and marked the board with sharpie so they would all line up. Here’s a progress shot–he is working on the bottom of the board:

headboard in progress

Note: we had already been to the hardware store twice that day and did not want to go out again to buy the appropriate length of screws. The drywall screws we used were too long and stuck out the back of the headboard!! I took this opportunity to break out the dremel tool we have had for several years and use the heavy duty cutter attachment to cut off the ends of the screws that were sticking out. Disclaimer: I do not recommend doing this unless you have a workshop. I did this on the apartment patio and it kind of scared the pants off me.

using a dremel

dremel-ed off screw ends

So as not to damage the walls, since the screw tips were still not flush, we covered the tips with two layers of painter’s tape. Another good option (that I still might use) is felt circles–the adhesive kind you can put on chair legs so they don’t scratch the floor.

Enough blabbing, let’s see some “after” shots!

DIY Plywood Headboard

DIY Plywood Headboard


DIY Plywood Headboard

I love the deconstructed concept and the pattern and texture the particles of wood have. The warm, cheery tone also plays well with the pillows and comforter. I know that it’s definitely not going to be everyone’s cup of tea, but I decided if I couldn’t afford a real, grown up headboard right now, to head in the totally opposite direction and do something funky and exciting. I mean, I’m not getting any younger, right?

Now the big question is… what to hang over the headboard? Ideas? 

PS: More OSB love here… In all truth, I found that article through Unhappy Hipster.

Our Bedroom, About to Change

So, after I moved in I shared where we plunked all the furniture down, then photos of the patio and as far as whole space tours, that was about it. Everything seems so in-transition and I didn’t think anything was “done.” Well, nothing is still done and we have been here almost four months, and I think things are about to change. We have Christmas and the expenses associated with it behind us, and I think I’m ready to do a DIY project for our headboard, but I would like to share photos of the bedroom as-is now so that I’ll have something to compare the “after” to.

Unfortunately, as I write this it’s easy to enumerate the sources of frustration here in the room and not so easy to list the positives. The good news is–there is a lot of room for improvement, which makes for a more dramatic “after!”

Bedroom

I’m still in love with the duvet cover, but have been having issues with the blanket inside it. When we bought the duvet cover, I bought a duvet insert on overstock.com which has nothing on the corners to tie the duvet strings to. Which means the insert gets all bunched up down at the bottom. Annoying. So, I tried putting our old gray pebble quilt from target inside it which has the same result. C’est la vie until I buy a proper duvet insert with holes in the corners (or whatever makes a proper duvet insert work with a duvet cover).

That was quite a tangent! How’s about another one?

I was distressed by the lack of headboard. It didn’t seem to matter in the old place because of the rich gray walls, but here in an apartment complex in an all-white box of a room, it just seemed sad. So we DIY-ed a little bit of artwork to act as a stand-in focal point. The lighting in the room is also a source of frustration since we have no overhead light and the arsenal you see here (two bedside lamps and the christmas lights) even when all on together, is very dim. Dim rooms are such a pet peeve of mine!

Bedroom

The glossy black dresser was mine in high school and my mom was very happy to see it out of her house. I have a project in mind for those space-aged handles…

bedroom

Another thing that needs to be contended with, I think I have mentioned before, is the dog kennel. We crate-train Mosey, which is great for both owners and dogs, but the kennel is U-G-L-Y! There really is no other space for it. Oh well! There is room in here, and it doesn’t obstruct traffic or anything–it’s just an eyesore.

Mosey & Newspaper

The BEST thing about the bedroom is the light in the morning. A sunbeam makes its way through the window slowly from the bed to the closet and Mosey is happy to sleep in it, shifting locations occasionally, from around 8 AM to 2 PM. This is wonderful as I can get stuff done on the computer or around the house without him pestering me to play! Side note–is that fake newspaper not the cutest dog toy you have ever seen? And is Mosey not the cutest blurry dog you have ever seen? Awww…

So, here is the bedroom! Nowhere close to “finished” but it has served us well for the past few months.