Our Bedroom, About to Change

So, after I moved in I shared where we plunked all the furniture down, then photos of the patio and as far as whole space tours, that was about it. Everything seems so in-transition and I didn’t think anything was “done.” Well, nothing is still done and we have been here almost four months, and I think things are about to change. We have Christmas and the expenses associated with it behind us, and I think I’m ready to do a DIY project for our headboard, but I would like to share photos of the bedroom as-is now so that I’ll have something to compare the “after” to.

Unfortunately, as I write this it’s easy to enumerate the sources of frustration here in the room and not so easy to list the positives. The good news is–there is a lot of room for improvement, which makes for a more dramatic “after!”

Bedroom

I’m still in love with the duvet cover, but have been having issues with the blanket inside it. When we bought the duvet cover, I bought a duvet insert on overstock.com which has nothing on the corners to tie the duvet strings to. Which means the insert gets all bunched up down at the bottom. Annoying. So, I tried putting our old gray pebble quilt from target inside it which has the same result. C’est la vie until I buy a proper duvet insert with holes in the corners (or whatever makes a proper duvet insert work with a duvet cover).

That was quite a tangent! How’s about another one?

I was distressed by the lack of headboard. It didn’t seem to matter in the old place because of the rich gray walls, but here in an apartment complex in an all-white box of a room, it just seemed sad. So we DIY-ed a little bit of artwork to act as a stand-in focal point. The lighting in the room is also a source of frustration since we have no overhead light and the arsenal you see here (two bedside lamps and the christmas lights) even when all on together, is very dim. Dim rooms are such a pet peeve of mine!

Bedroom

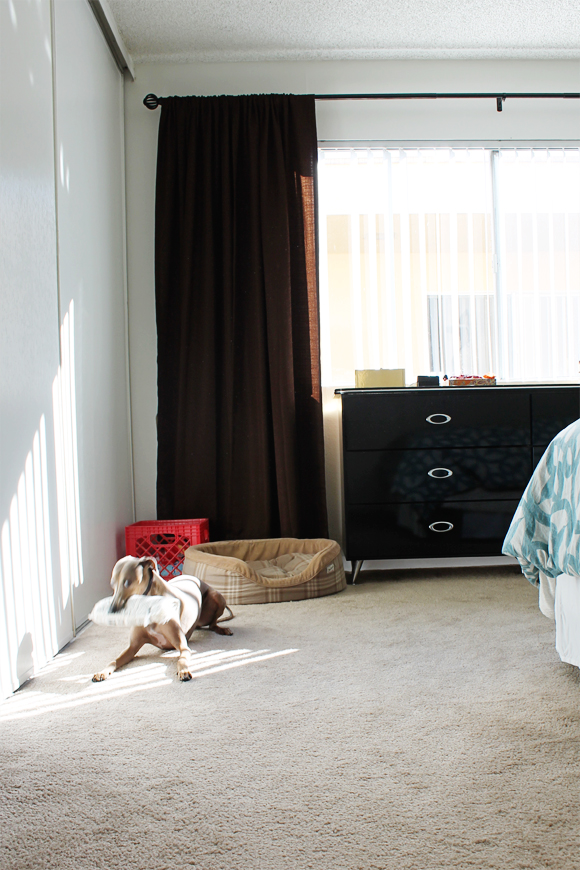
The glossy black dresser was mine in high school and my mom was very happy to see it out of her house. I have a project in mind for those space-aged handles…

bedroom

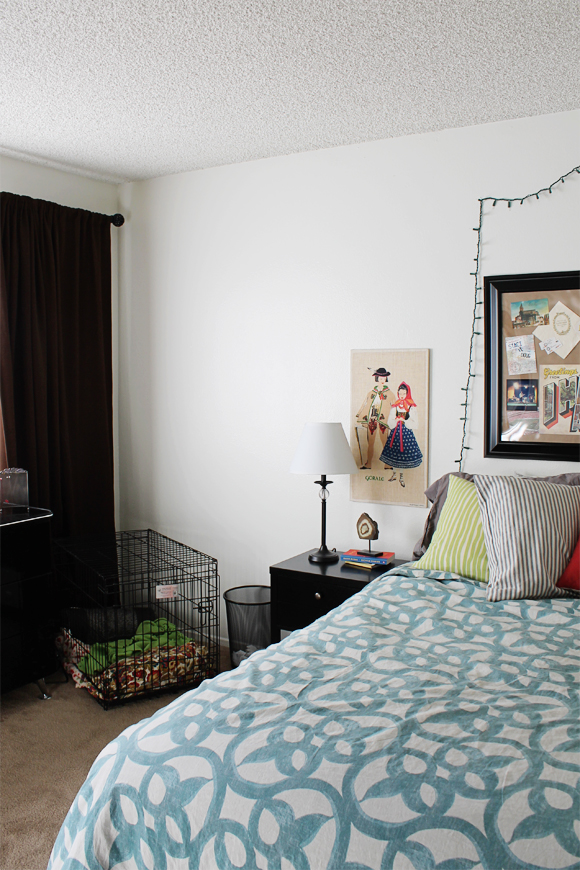
Another thing that needs to be contended with, I think I have mentioned before, is the dog kennel. We crate-train Mosey, which is great for both owners and dogs, but the kennel is U-G-L-Y! There really is no other space for it. Oh well! There is room in here, and it doesn’t obstruct traffic or anything–it’s just an eyesore.

Mosey & Newspaper

The BEST thing about the bedroom is the light in the morning. A sunbeam makes its way through the window slowly from the bed to the closet and Mosey is happy to sleep in it, shifting locations occasionally, from around 8 AM to 2 PM. This is wonderful as I can get stuff done on the computer or around the house without him pestering me to play! Side note–is that fake newspaper not the cutest dog toy you have ever seen? And is Mosey not the cutest blurry dog you have ever seen? Awww…

So, here is the bedroom! Nowhere close to “finished” but it has served us well for the past few months.

Advertisement

Space Planning

Space planning is really, really key when it comes to maximizing your apartment’s square footage, especially when living in a small space (mine is around 840 square feet. I’m not complaining; it really could be smaller). The point of the following ramble is to show you that you don’t need to follow “the rules” when it comes to placing the layout of your space!

  • If you entertain a lot, and don’t even own a TV, you will be devoting much more space to a dining area–possibly to seat 6-8! (Most apartments seem to be designed to seat around 4 comfortably.)
  • If you are clueless in the kitchen and eat out every meal, why bother with a dining room table? A bar stool at your counter for morning cereal and coffee might be all you need.
  • If you live alone and really, really need a dedicated office space, consider using a daybed in the living room and turning the bedroom into a mega-productive office.

Those are just a few examples I could come up with off the top of my head. Don’t let yourself be limited by where items “should” be!

A while ago, I shared the floor plan that my complex’s pamphlet assumed I would go with but just for refresher, here it is, including my notes for where I planned on placing furniture. Note: My unit is the reverse of this, but you get the picture.

As you can see, “they” assumed that the dining area would go right outside the kitchen. Unfortunately, for me, plunking down a table and chairs in the intended dining area would cause a major obstruction to the flow of traffic. Instead I’ve got my dresser sideboard, desk, and china cabinet blocked in around the perimeter, and the major floor space open to lead nicely into the living/dining space.

Above is a quick little floor plan I threw together on floorplanner.com to show you how things are really goin’ down around here. As you can see, the living and dining spaces are side-by-side at the back of the unit, with the “extra” area serving triple purpose of entryway, office, and storage.

Here’s a tip: Online floor planners are fabulous tools, but on many of them, if you don’t have a paid account (I don’t), you can only do one space at a time. Also, their selection for furnishings is very limited (as you can see) but overall I love these tools for doing virtual re-arrangements (so I don’t go and move around all my heavy furniture only to discover that I hate it). 

Here’s my fancy “flow of traffic” arrow. Isn’t it nice that there’s no real need to go around anything to get to the back of the unit–where most of the socializing and hanging out would occur anyway? this arrangement is totally my jam.

Here’s a tip to be filed in the “do as I say, not as I do” category. In order to NOT waste your time, measure stuff. See the plan above? Totally eyeballed. Since I do live in my space, I know approximately how big things are, how far away from the wall stuff is, etc. If you want to get the most benefit from your space planning, please measure your space, then measure your furniture items. Floorplanner.com (and most other online floor planners) will have an option for you to change the size of everything, down to the inch. 

Remember my three imagined scenarios from the beginning? Well, using much of the same furniture, I came up with alternate-reality versions of my apartment.

The entertainer who has no TV: the focus here is really on the dining area, which seats 8. 

The TV fanatic who doesn’t cook: movie nights will be epic with the addition of another couch, and added shelving provides storage for a huge movie collection. Note the folding table for one.

Turn the bedroom into an office: Slip the bed behind a couple of folding screens and create a “bedroom” where there was previously open space.

Bohemian Direction

I got a great question (from my mom) in the comment section on last week’s State of the Home post.

What kind of vibe are you going for in the new place? Will you keep the eclectic mid-century/urban look, or go for something else?

It has been a real head-scratcher as to why I can’t seem to catch my last place’s mojo and infuse it into the new place. I have the same furniture and the last place had all white walls. Should be easy to translate to an all-white apartment, right?

Wrong.

I know I shouldn’t be so hard on myself. We just moved in three weeks ago? Anyway I was trying to put my finger on it and I realized a few things.

  1. The old place was oozing architectural details–the fireplace, vaulted ceilings, arched doorways, to name a few.
  2. The old place was broken up in a much more chunky way.
  3. With lots more windows (see #1) there was more opportunity for texture- like lots of different curtains and the bamboo shades.
  4. While I thought the last place was dark (and it was compared to our light-soaked loft apt) this place is even darker! In order to put a positive spin on it, I’m going to call it “moody.”

Instead of clinging to the light and airy eclectic-meets-mid-century-mod feel of the old place (what a mouthful!), I think I need to make a slight shift to the bohemian side of things. Obviously I can’t just ditch all the existing furniture, but I can reuse items in ways that seem more laid-back and incorporate more fabrics–getting more creative than just curtains on windows to add texture, and bring in more aged objects (maps, etc). I live in California now, after all, I should be able to find tons of old hippie cast-offs at area thrift stores.

Naturally, I turned to Pinterest for inspiration. I have written before about my technique. I do not look for inspiration by searching Pinterest for a key word, nor do I look at old pins, but I look at what I have pinned in the past and what images I am still drawn to even now, a few months or even a year later.

I have a bright white dresser acting as buffet/sideboard–it is the first thing one sees when entering the apartment. Gotta soften that corner somehow. I also have three bright white bookcases now (post coming on those soon!). So the place is leaning a bit towards “mod” at the moment and I need to lean it back toward “boho.” There: a goal has been set.

Images: Please click through for the full tours and much more!

  1. Giovan & Chloe’s Handmade Honeymoon Home on Apartment Therapy
  2. Tommy & Todd’s Bohemian Chic Collection on Apartment Therapy
  3. Michael’s Masculine & Modern Open Studio on Apartment Therapy
  4. Justina Blakeney’s Bohemian Bedroom <$1000 
  5. A room Julianne Moore decorated, photo linked by Emily Henderson

So, in conclusion: 

  • I’m going to fill up the walls.
  • I’m going to find some kind of awesome brass accent.
  • I’m going to dial down the colors a bit from bright to muted.
  • I’m going to hang way more curtains than necessary.
  • I’m going to layer rugs on top of carpet.
  • I’m going to get a plant and try to keep it alive!
  • I’m going to make the open layout work for me not against me!

And with that, I have created myself a compass to look at while making decisions! Do you have a decor compass you use when you’re stumped?