DIY Wedding Invitations

Well, Stephanie is in Maui and I’m missing her like crazy. Is there a better way to get over it than to reminisce about the planning and preparation that led up to last weekend? Is it too early to reminisce?

If you’ve planned a wedding you know that invitations are crucial for setting the tone of the event and can get expensive really quickly. I’ve seen invite suites that exceed $4 per invite… if you plan on inviting 100, 200, 300 people the price can get astronomical very quickly. Lucky for me, I have some wonderful friends in the printing business. They designed and printed my wedding invites for me in 2010, and have always been patient in indulging my amateur graphic designer side by allowing me to submit my own work for them to print. Case in point: Stephanie’s wedding invitations!

For her event, Steph wanted a simple and classy affair, and chose the color scheme “magenta with metallics.” Early in the planning process she had also mentioned working in Art Deco elements, so I took a few cues from that and created something that I think fits the bill and is unique. Do you think it fits the vision?

The paper looks pretty white on my computer screen, but FYI, it was printed on an ivory-cream stock.

DIY Wedding Invites

I created them using Microsoft Publisher, since that’s the program I’m most familiar with. I now have the full Adobe suite on my mac and would love to learn more programs, but time wasn’t cooperative in this case. So Publisher it was. I think they turned out very nicely.

DIY Wedding Invites

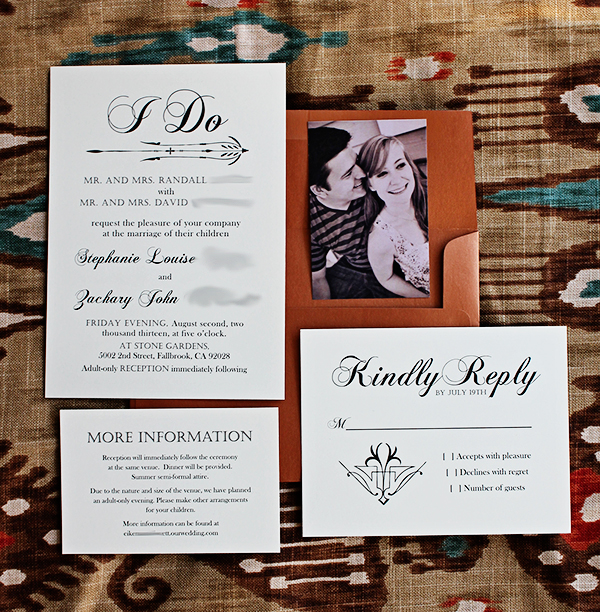
The fonts are Chopin Script, Castellar, and Baskerville Old Face… in case you were curious.

Since the invite suite was simply cream with black text (classy looking , AND cheaper that way!) We used metallic bronze envelopes to spice things up. I think it worked really nicely. We were able to print these for right around $80–including 200 invites, RSVP postcards (two sided) and the info cards. The envelopes added a bit to the cost but we definitely saved a lot of money compared to ordering suites online or out of one of those catalogs they have at print shops.

Here are some of my tips in case you’re interested in trying this out yourself:

  • Look at other invites to see what kind of styles you like and would feel confident in mimicking.
  • Make lots of test prints! What looks good on your computer might look very different on paper.
  • Keep things simple! By limiting my color scheme to black and white, I was able to easily drop in some art deco designs I found online.
  • Limit yourself to three kinds of fonts. This is a basic graphic design tip you’ll see all over the place. If you start going too crazy with fonts, things can become too busy and look more amateurish than you need to.

Have you ever designed your own paper goods? Business cards? Christmas cards? 

Advertisement

Coffee Talk Epilogue: Nespresso

Last February I shared a three-part series detailing my experiments with at-home coffee making… without using a standard Mr. Coffee. If you missed them, make sure to check out my tips and tricks for a French Press, Mokapot, and Pour-Over!

Have you heard of Nespresso? It’s a capsule-based espresso system. Their commercials here in the US feature Penelope Cruz, but internationally George Clooney is their spokesman.

(Bonus points if you recognized “Nora” from How I Met Your Mother)

I have a quick epilogue to add to my coffee conversation! My kitchen has a new little addition to it. I sell Nespresso machines at work and well… you can see, I’ve sold myself on it!

Nespresso

My machine is the budget-priced Essenza, but my favorite machine is the cute and user-friendly Pixie

Espresso is a different animal than coffee is: its flavor comes from water forced through a tightly packed shot at a high temperature and high pressure. That’s why the flavor is so intense and most espresso shots are only 1 to 2 ounces. When you order a latte at Starbucks, it’s normally two small shots added to steamed milk. Think–you’re really paying $3+ for four ounces of coffee!

Nothing against grabbing a latte out with friends–I love meeting up at a coffee shop with people. It’s grabbing a quick latte every day before work that becomes a big-time money suck. Enter Nespresso: the machines heat up in no time and the flavor options they have available are really delicious… and for 60 cents a shot–it’s much faster and cheaper than going through the Starbucks drive through on the daily.

Nespresso

When I have a lot of time in the morning, or a lot of writing to do and want a massive carafe of coffee that will last for hours, I still default to “normal” style coffee made in my French Press (which I’m getting better and better at making!) When time is of the essence and I want a yummy caffeine fix, my routine is this: prepare my cup with a small spoonful of sugar. I run the capsule through my Nespresso and then finish the cup off with milk. This process takes roughy two minutes–120 seconds!

I’m not getting paid or perked by Nespresso to write this post–Just sharing the technology that’s out there with you all in case you hadn’t heard of these machines and were suffering from paying too much for specialty coffee drinks every day.

DIY Graduation Money Lei

Last weekend I had the privilege of heading up to LA to celebrate my sister’s great accomplishment–graduating from college! She even graduated on time, more than I can say for myself!

Something that’s really common in Southern California is that graduates often receive Hawaiian leis to wear with their robes. Usually they are real flowers, although I have seen artificial ones, candy leis, and money leis! Instead of buying a lei I decided to make one myself combining candy and money.

While I was working on this project, Doug asked if this was a common tradition. I realized that in all the graduations I’ve attended in Kansas– I never saw a grad receive a lei! Usually if they get flowers, it’s in a bouquet. I guess this gift has become more widespread in California because there are a lot of Hawaiians and other Pacific Islanders living here. I’ve seen leis given to grads by family and friends at every graduation I’ve been to here in CA, and I love this tradition!

Money Lei Supplies

To make this product, I used two long chains of candy, tape, money, and ribbon. If you don’t have access to cute Japanese candy like I had, you can make a candy chain with any kind of candy by following this video. San Diego locals: I got the candy chains at Marukai Market on Convoy St.

To make your own–here are the steps!

  • I taped the chains of candy together using packing tape to make them into a necklace.
  • Cut the ribbon into lengths you feel comfortable tying into small, tight bows. My pieces of ribbon were about ten inches long.
  • I decided what color pattern I would tie my bows in–this is an extra step since I ran out of burgundy ribbon… I had to sub in some raffia in a couple of places. I ended up going with two burgundies, then one raffia (repeated x 4). Making a pattern looks really nice though, and you could use school colors!
  • I double-knotted the ribbon between candy pieces first, before adding the money, just to make sure it was tight. I did all of this at once, then it was time to add the money!
  • To make the dollar fans: First, you want to fold all of your bills into a tight accordion.

Dollar Accordion

  • Then, attach this to the lei by tying a bow around the center of the accordion. Make sure the accordion is “standing up” from the candy at a 90-degree angle, and that your bows are very tight and secure!

Money Lei Process

  • Finally, create a fan by opening up the accordion and taping the edges of the money together. The nicer your money is, the nicer the fan will be. Try to get crisp bills!

Money Fan from Back

Money Fan from Front

This project took me a little over an hour, after I had gathered all of my materials. This is my own twist on the regular money lei. If you want to see a “normal” version accompanied by a how-to, check out this video. I used the video as a resource as far as figuring out how to create my dollar fans–I think he uses over $50! Full disclosure: I used $20. Ten 1-dollar bills and two 5-dollar bills, which meant I created 12 fans. You can make a lei with any amount you want!

I know, I know… you’re dying to see the graduate with the finished product!

Steph's Graduation

Congratulations, Stephanie! Your family is so proud of you!